- Blog
#Development #QA #Testing
Project Blueprint: Quality Assurance
- 24/04/2024
Reading time 7 minutes

As mentioned in my previous blogpost the new Azure Digital Twins service was announced as a public preview since the end of June 2020. What better way to explore a new service by mapping it onto a real-life use-case.
In my case, the decision was made to map my house aka home office in the new Azure Digital Twins, and explore all the new features hands-on. Throughout this blog post, I will describe how to model and map any environment in Azure Digital Twins. Expect more blogposts soon that will touch upon the other features of Azure Digital Twins.
To interact with Azure Digital Twins and upload your models, create your twin and relationships you’ll need an Azure Digital Twins instance to work against. The following articles from the Microsoft docs will guide you through the steps to set up a new Azure Digital Twins instance, these two parts are key to setting up an instance.
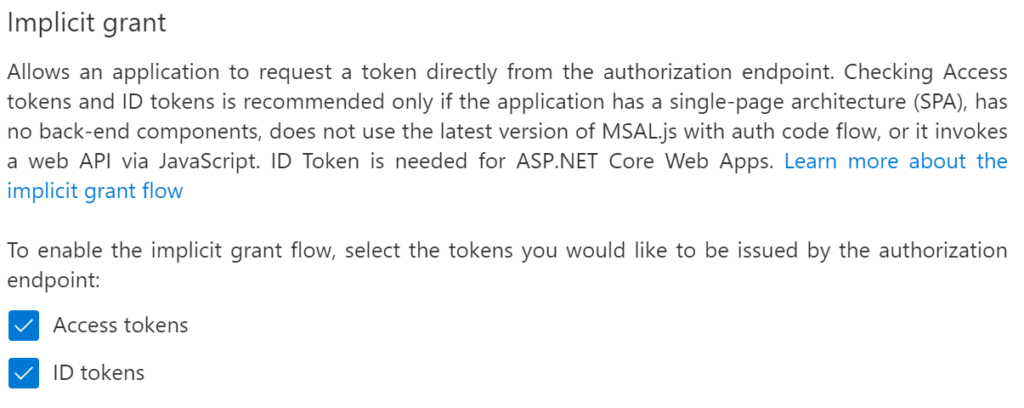
Make sure to validate all necessary settings, in my case I had to make some additional changes to the app registration and enable implicit grant for OAuth2 flows as shown below.

Another crucial part in the setup of Azure Digital Twins is the correct assignment of RBAC permissions on the Digital Twins instance, both your user account as the app-registration should have the ‘Azure Digital Twins Owner (Preview)’ assigned. In my case next to my user account and app-registration I also have an App Service assigned that is used in my demo setup.

Throughout this blog post, I will use the Azure Digital Twins Explorer, this is a sample application that allows you to visualize the twin’s graph with a number of layout techniques. This tool can be downloaded from the Azure-Samples Github page.
Creating and building your twin graph is done through user-defined models. In Azure Digital Twin models are written using the JSON based Digital Twin Definition Language (DTDL) and allow users to define semantic relationships between twins and connect them into a graph.
Digital Twin Definition Language (DTDL)
Models describe twins using the DTDL model interface and can contain following fields:
Now that we’re on the same page, let’s start modeling our home office.
The first Interface we’re creating is the one defining our house. This will be our main entity, the top level of our digital twin. The most important fields to take into account are the @id and the optional displayName field. Both @type and @context will contain the same fixed value throughout all of your custom models
The @id field must be in the following format dtmi:<domain>:<unique model identifier>;<model version number>
The model version number will be important when you have multiple versions of your model available and you’ll need to manage the lifecycle of your models. For example, you can decommission older models without impacting already existing twins, but forcing new digital twins to use the new version of the model.
{
  "@id": "dtmi:demo:House;1",
  "@type": "Interface",
  "displayName": "House Interface Model",
  "@context": "dtmi:dtdl:context;2",
  "contents": [
    {
      "name": "ConstructionYear",
      "@type": "Property",
      "schema": "string"
    },
    {
      "name": "Owner",
      "@type": "Property",
      "schema": "string"
    },
    {
      "@type": "Relationship",
      "name": "floors",
      "target": "dtmi:demo:Floor;1"
    }
  ]
}
It’s important to know that all data, besides the @id and the optional displayNameis placed inside the contents element as an array of attributes. In our case, I’ve added properties to identify the construction year and property owner.
Next to the properties, there is an important element that defines the relationship with another interface, our floors. This definition of relationship will allow the solution to provide a graphical representation of the interrelated entities. The interface that completely describes the floors is shown below, as you can see this contains another relationship to the bottom level of our graph, the rooms.
The rooms model itself contains 2 telemetry properties, Temperature, and Humidity. These telemetry fields are used to describe the sensors that are available inside the specific rooms.
Telemetry is not stored on the digital twin . It’s a stream of events.
{
  "@id": "dtmi:demo:Floor;1",
  "@type": "Interface",
  "displayName": "Floor Interface Model",
  "@context": "dtmi:dtdl:context;2",
  "contents": [
    {
      "@type": "Relationship",
      "name": "rooms",
      "target": "dtmi:demo:Room;1"
    }
  ]
}
{
  "@id": "dtmi:demo:Room;1",
  "@type": "Interface",
  "displayName": "Room Interface Model",
  "@context": "dtmi:dtdl:context;2",
  "contents": [
    {
      "@type": "Telemetry",
      "name": "Temperature",
      "schema": "double"
    },
    {
      "@type": "Telemetry",
      "name": "Humidity",
      "schema": "double"
    }
  ]
}
Now that we’ve defined our base models, it’s time to start interacting with our Azure Digital Twin instance and create digital twins based on our models and create the relationships between them.
Before going into details on how to create digital twins and map the relationships, let’s upload our models to the Digital Twin instance first. The snippet below shows you how to create a new DigitalTwinsClient based on the Azure Active Directory tenant and client id (this is where our Azure AD Application registration comes in to play).
Once we have our client, we can upload the list of our models to the Azure Digital Twins instance by using CreateModelsAsync. The dtdlList in the example below contains a list of deserialized JSON files, our models.
var credential = new InteractiveBrowserCredential(tenantId, clientId);
DigitalTwinsClient client = new DigitalTwinsClient(new Uri(adtInstanceUrl), credential);

List<string> dtdlList = new List<string>();
//Add JSON models to the list of string
Response<ModelData[]> res = await client.CreateModelsAsync(dtdlList);
After uploading the models to the Azure Digital Twins instance we can start creating our digital twins. In the snippet below you can see both approaches to create a digital twin.
The first twin we create is our top-level twin, the house. As you can see, you need to specify the metaData (model and kind) for the twin you are creating, together with the twinData. The twinData are the properties you defined inside your model, in our case ConstructionYear and Owner. After that, you can call the CreateDigitalTwinAsync while providing a unique digitalTwinId, in our case ‘127.0.0.1’.
For consecutive twins (Floors and Rooms) we only have to specify the metaData (see that we’ve changed the $model from House to Floor) as we did not create additional properties on the Floor and Room models, only relationships. We’ll touch upon those in the next steps.
var metaData = new Dictionary<string, object>()
{
    { "$model", "dtmi:demo:House;2"},
    { "$kind", "DigitalTwin" }
};

var twinData = new Dictionary<string, object>()
{
     { "$metadata", metaData},
     { "ConstructionYear", "1985" },
     { "Owner", "Glenn Colpaert" }
};

await _client.CreateDigitalTwinAsync("127.0.0.1", JsonSerializer.Serialize(twinData));


metaData = new Dictionary<string, object>()
{
    { "$model", "dtmi:demo:Floor;1"},
    { "$kind", "DigitalTwin" }
};

twinData = new Dictionary<string, object>()
{
     { "$metadata", metaData}
};

await _client.CreateDigitalTwinAsync("Floor1", JsonSerializer.Serialize(twinData));
await _client.CreateDigitalTwinAsync("Floor2", JsonSerializer.Serialize(twinData));
await _client.CreateDigitalTwinAsync("Floor3", JsonSerializer.Serialize(twinData));

// Repeat for all digitalTwins you want to create. Floors, Rooms,... Don't forget to change the $model when creating different types of digitalTwins
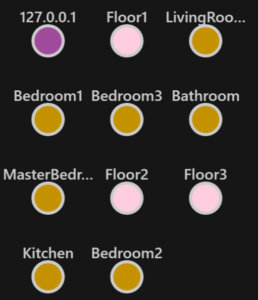
When running the digital-twins-explorer after executing the steps above, you’ll notice that all digital twins are created with their specific properties and Ids. To leverage the full functionality of Azure Digital Twins we need to create relationships between our created digital twins. The relationships will be created according to the model we’ve defined.
After creating the digital twins, it’s time to set up the relationships between them. In the snippet below we’ve created a relationship between our top-level entity (house), floors, and rooms by calling the CreateRelationshipAsyncmethod.
The key part when setting up these relationships is both defining the correct $targetId as well as using the correct $relationshipName as defined inside your model. Defining a clear relationshipId (in our case ‘localhost_to_Floor1’ and ‘Floor1_to_kitchen’) will help you to identify the relationship you’re working with when interacting with the Azure Digital Twin instance.
var body = new Dictionary<string, object>()
{
    { "$targetId", "Floor1"},
    { "$relationshipName", "floors"}
};

await _client.CreateRelationshipAsync("127.0.0.1", "localhost_to_Floor1", JsonSerializer.Serialize(body));

body = new Dictionary<string, object>()
{
    { "$targetId", "Kitchen"},
    { "$relationshipName", "rooms"}
};

await _client.CreateRelationshipAsync("Floor1", "Floor1_to_kitchen", JsonSerializer.Serialize(body));

// Repeat for all relationships you want to create. Top level to floors, floors to rooms,...
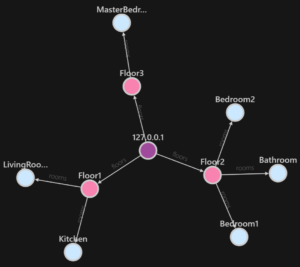
When running the digital-twins-explorer after adding the relationships above, you’ll graphical representation of your Azure Digital Twin instance will look like this. Further functionality can be built upon this model and set of Digital Twins, but let’s keep that for another blog post.

Creating your own Azure Digital Twins models and vocabulary can feel a bit overwhelming at the start. It is key to clearly define the environment and domain you will model in Azure Digital Twins first, before creating the actual DTDL models. After that, it’s key to create clear Id’s and to set up the correct Relationship types inside your model.
As discussed in this blogpost further functionality can be built upon this model and set of Digital Twins. If you can’t wait to explore other functionalities of Azure Digital Twins, be sure to check out ‘how to build out an end-to-end solution’ from the official Microsoft Documentation.
Stay tuned for more Azure Digital Twins!
Glenn

Our newsletters contain stuff our crew is interested in: the articles we read, Azure news, Zure job opportunities, and so forth.
Please let us know what kind of content you are most interested about. Thank you!